30 Sept 2013

Gallery - The Veteran

Another finished piece, medieval knight bust from JMD miniatures, which I called The Veteran.
Due to some issues with the sculpt I decided to add some scars on his left cheek to hide some of them.


cheers

'eM

29 Sept 2013

Gallery - Da Rock

Final photos of my orc bust ein Stein (Da Rock).
I've been posting so many wips from this project so there is really not much more to say about it. You can always check out earlier post about this bust, to see how it was shaping up.
I entered this bust into the EuroMilitaire competiton last weekend, in Folkestone, where it managed to get Silver in Fantasy Bust category. I must say I'm pretty happy and proud.
I hope you like it.

pnp

cheers

'eM

28 Sept 2013

Euromilitaire 2013 photos, reports

Well it took me a bit more time than I expected, but finally I managed to gather together some photos and videos from last weekend.


Photos taken by me:
Part1
Part2
 
Euromilitaire - Best of Show, posted on PlanetFigure by Paco
Alex Long's gallery
Mario Delgado's gallery

Smudger1960 photos posted on PlanetFigure:
Part1
Part2
Part3
Part4

And some facebook galleries.
I hope they will be visible for everyone, not just for friends, but if that's the case, I'm sorry.
John's fb gallery
Pekka's fb gallery

Here
you can find a proper report from the show done by Painting Buddha, Michael. And of course his photo album.

And a bunch of youtube videos published by:
Cursed Monkeys
Mr  Bob's build (flats)
Mr Bob's build (figures)
Mr Bob's (armour)
jamesbritton1

enjoy

'eM

23 Sept 2013

Next stop - Hussar!


With EuroMilitaire behind me (photos will be sorted out tomorrow), I'm already thinking where to go next. And it looks like the next stop will be Warsaw, and 4th edition of painting competition called Hussar. Well it was called Slayer of Demons at the very beginning, but even if the name changed, the people behind the event are the same, so I just count it as one event.

It's gonna be my second time, as I was there in 2011. One of my entries did pretty well back then, so I'm really hoping I won't embarrass myself this time... Which may proove difficult, as the competition there is really fierce. As far as I know all the top Polish painters are expected to be there (maybe the group is not massive, but very very talented and skilled) plus some from abroad, so we can expect many excellent entries, and as I said, tough battle for trophies.

The show is on 19th of October 2013, as part of the “Weekend with fantasy” held in the Community Centre Rakowiec – 8 Wiślicka St., Warsaw, Poland.
Here you can find all the necessary informations about the competition itself, categories, rules, and planned attractions (i.e. workshop with Karol Rudyk, speedpainting comp). And of course galleries and reports from previous years.
So if you have a free weekend, and would like to try something new, don't be affraid and just give it go:D

And there is one more massive attraction.... the after party. And not just some after party, but a party held in a little cafe in the same building, the cafe that still keeps the feel of the 80's in Poland... A true treat for the connoisseur;] As I'm old enough to remember that time (sadly), I just felt there like a child again.

As for me, I need to start planning my entries, and I need to do it really fast;] Less than a month left...


cheers

'eM

19 Sept 2013

Mines of Knowledge


I know I rarely write about something else than my painting here. It's mostly due to the fact, that I treat this blog kinda like a diary of my 'struggle' with the matter. But I do know, and appreciate that we are not alone with our passions (even if painting is pretty solitary activity). We are actually creating  really rich, nourishing, and what's most important, very friendly environment, where we can develop our skills and creativity. There is so many very gifted and generous people, who share their passion, and knowledge with the rest of the group. I'm personally extremely grateful to each and every of them. I wouldn't be who I am today, as a painter, but also as a person, if not for them.

But it is very difficult to keep track of everything that is happening in our hobby. Even with all the help of social media, we have on our disposal, it is next to impossible, to be up to date with all the new wonderful paint jobs, new releases and articles being published. At least I know, I couldn't do that.

But there is someone who can. Or rather I should say, they are...
People running those two blogs, are my heroes, when it comes to the 'sharing spirit' of our community. Not only do they paint, but they also find time, and good will, to prepare for the rest of us every week, a very condensed capsule of news from our not so little hobby world.

Of course it is impossible to include everything (or for that matter, even know about everything that's happening in our hobby) but the news are really versatile, and everyone can find something interesting there. And of course, they are run by completely different people, and the choice of news in both is different.  So it's worth to check out both of them, to get better coverage.

1. War in miniature
This blog is bilingual, written in Polish and English. So no one will have any trouble finding interesting news from their corner of the hobby. (edit:) News are published every second Sunday.


2. Quidamcorvus blog
Even though this blog is only in Polish, there is no reason to skip it, if you don't speak the language. Just ask the Google Translator what the every subtitle means and simply check out the links to galleries, tutorials, or new releases. I bet you won't be disappointed.
Once again, news are published once a week, Sunday or Monday.


And if you'll visit their blogs, and find there something interesting (as I'm sure you will), say hello to the boys/leave a feedback, so they know their hard work is appreciated.

cheers

'eM

18 Sept 2013

Ein Stein - yet another WIP photos

Well, two days left, and my Ein Stein is not yet ready. And it's not making me happy. But I messed up with the back of his ears. The veins I was trying to paint there din't turned out as I planned so I had to repaint this part. Sadly achieving the smooth transition was next to impossible this time, so I had to settle for some dot pattern...  I hope it will suit this bust and rest of the paint job.

I still need to glaze it a bit to make the dots more organic, and then I need to fix the name tag on his back (which is a massive pain in the neck due to the colours I used) and then just few touch ups and it should be ready to go. At least I hope it's just few touch ups.... after such a long time with a mini, it's hard to see it objectively.


cheers

'eM

15 Sept 2013

Knight bust - finished or not?

As the title asks, what do you think? Is it finished or not?
I'd most certainly like to say it's ready to go on the shelf. But sadly I think I lost my perspective here. I guess I need to put it on a side for a few days, and then revisit it with fresh eye.
But if you see any places that could be improoved, please let me know:D


cheers

'eM

14 Sept 2013

Painting buddha set - inbox, part one - Brad and Yanet

I'm still watching the DVDs, and I don't want to review it before I finish all 6 of them, so  today I'm gonna show you Brad and Yanet, two beautifully sculpted miniatures you can find in the set.


Minis:

(here is the photo of both pieces painted for the DVD,
left one painted by Ben Komets, right one, by Rafael Garcia Marin)

Name: Brad and Yanet
Scale: 1:32 (54mm)
Material: resin


The box in the box:


Inside the big black box you can find, among other things, small metal box containing mentioned earlier miniatures. It is a really nice touch, telling you how much attention and care went into preparing the whole set. When you think about that, minis could be simply protected by the bubbly bag or just a plastic bag. The box is purely to spoil us, I guess:D


In the shiny box:


In the metal box, between two layers of foam, we can find multiple parts of resin. Once again, pretty good protection. Even rough treatment during the delivery shouldn't damage thin and fragile parts.


Quality of the cast:

Below you can find a close up portrait of our couple. As you can see there are some mould lines, but in the non crucial places, so they should be easy to remove, if you'll be carefull and patient enough. The most important part, at least for me, is that all the details are crisp and clear.


A bit more work, even if easier, will be with the base, to secure it properly to the plinth, you'll have to remove all the extra resin on the sides. Other than that though, the cast of the elements for the base, is perfect and very detalied.


Assembly:
Looks pretty easy. Miniatures are casted almost as single pieces.The only tricky part, at least for me, will be drilling holes in he wrists and hands to pin them. Assembly of the base, on the other hand, will be pretty straightforward. Nothing should go wrong here;]


Overall opinion:
Beautiful couple. Really nicely casted and packed/presented with lots of care. It's even more imperssive when you remember it's just miniatures added to the painting DVD. I doubt any other company would take so much care and effort to prepare them.
And I'm pretty sure they would sell very well on their own, as a separate kit.

11 Sept 2013

El Markes - finished piece

After long months of pain and sorrow, and some swearing, I managed to finish Mr Markes.
It's hard to believe but he was almost ready for few months now, I simply couldn't bring myself to finish him and put on the shelf. Mostly due to his weirdly sculpted chest... and hair...
I seriously doubt I'd like to paint another one. And I'm pretty sure I wouldn't buy any other of their busts or miniatures online.
But anyway, El Markes is finished:D And I'm quite happy with some of elements of this paint job. Especially the hat and freehand on it.
And what do you think about Mr Markes? Do you like it at all?


cheers

'eM

10 Sept 2013

Viking's base, phase two - painting


This time it's not gonna be step by step article. I will focus more on separate parts of the base: the trunk, bark, mushrooms and rotting foliage on the ground.

The trunk
Even though the piece of heather I used, looked already pretty much like a fallen tree, I decided to paint it anyway. For one thing I felt it lacks some discolourations and delicate moss here and there. But mostly because I feel that natural, unpainted materials look weird next to painted miniature. Painting them unifies the whole piece.

So first I took care of the naked parts of the trunk. Using GW washes, GW Graveyard Earth and P3 'Jack Bone I covered the areas in paint creating way stronger contrast and some variations in colour that could appear in a wood exposed to the weather for a long time.
The damaged parts of the front were a bit more tricky, as it was quite difficult to reach the deepest recesses with a brush. With a big and old brush I managed to introduce darks washes and some Catachan Green (GW) to emulate moss that could fint it's way there.


The Bark
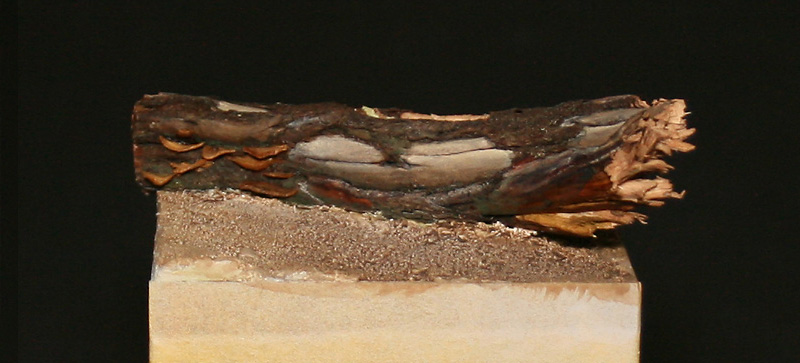
For this part I used mostly dark brown, some GW washes, a bit of P3 'Jack Bone and lots of GW Catachan Green.  Brown, washes and 'Jack Bone was used to even out the colour (with drybrush), and introduce some contrast. Thin layers of green placed mostly under the trunk and in the recesses look like a moss that often grows on the older trees. If you're not sure what I'm talking about, just google 'old bark moss' and you can find lots of various examples.

Below you can see various stages of painting, from the very natural unpainted wood to the final version. I decided to post only one set of photos for both, the trunk and bark because they would be very similar, and you can see all the steps of painting here


Mushrooms
Mushrooms are the exception on this base. They were mostly left as they were in natural state. I was affraid that too much paint would cover the natural pattern of the tabacco stalks reminding so much the true mushrooms. I just used some GW washes (brown and green) to unify the colour a bit with the rest of the base. But as the shrooms are quite alive, unlike the fallen trunk, they grow and feed on, I kept them in warmer colours.
Below you can see photo with shrooms just after glueing them to the base and after washes. On the third frame, under different angle, you should be able to see the pattern I was talking about, darker an brighter lines creating some visual interest and emulating the real mushrooms.


Dead leafs and ground
This parts were painted mostly the same as bark. Dark brown washes and some  'Jack Bone to create contrast and unify these parts with the rest of the base and some green washes to emulate moss that starts to grow on the leafs. I was focusing the green mostly under the trunk, at the front, and in deep shadows, but there is also some amount of moss in the open areas. I assumed that if the leafs are laying there for few months, and starting to rot already, there should be some moss growing on them as well.
The photo below isn't the best one, but you should be able to see some greens on the ground.


Fern
Fern was painted mostly with the airbrush, with Catachan Green as a base and some mixture of GW Desert Yellow and Snakebite Leather to do the highlights. For the shadows I used various GW washes. I have no photos from painting this part (even though I'm pretty sure I took some), so you need to take my word for it:D

And I thinkt that's all I could tell you about painting this base.
I hope you find this tutorial helpful. And if you have any questions, or comments, just leave a note underneath, I'll be happy to answer.

Viking's base, phase one - building

cheers

'eM